Air brake chalk board What is he talking about??? Locomotive and Train braking via the No.26 Brake Valve in Tales of the Jointed Track
- July 6, 2018, 10:14 a.m.
- |
- Public
This will deal with the Automatic Brake Valve. No, we just don’t go to release condition to a full service application position. When you brake your car or truck, you adjust your foot pedal pressure, for a slow and gradual stop. You stand on the brakes only when necessary. Same with a train and a rolling release is planning, and what train make-up is and terrain.
The 26 brake valve is a simple brake valve to explain. This is the newer valve that has been prominent from the early 60’s to the present. The desk top brake valve are an off shoot of this, and the the newer electo-pnuematic brake valves are an off shoot of this as well. These are self lapping valves, meaning, if you set 10 lbs of air, and the handle stays put, till either an additional set is required or the release is initiated. The older 6 and 24 RL’s required you to go to the service zone, and draw down with the equalizing reservoir, then go to lap position on the valve. Lap would allow the equalizing reservoir to draw down, to what you wanted set. If equipped, a small notch to the left was the pressure maintaining feature, which overcame brake pipe leakage and held tour set. With a self lapping valve you don’t have to worry about brake pipe leakage over coming your set. Pressure maintaining will automatically come in, and keep your set till a release is desired .
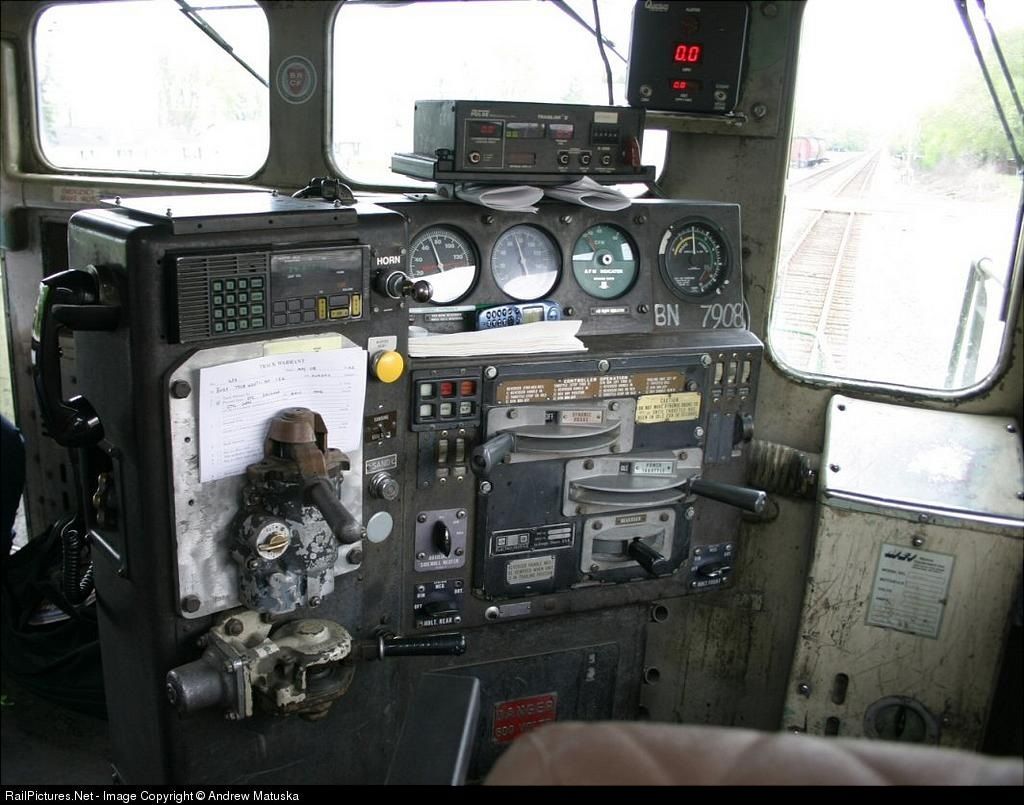
A former BN SD-40 control stand. The picture of the 26-L automatic brake valve has the handle in the full service zone, but you can see the notches. I’ll elaborate
further. The odd looking brass colored knob, located just under the radio handset, is the feed or regulating valve. This is where you adjust your working brake pipe pressure. The gauges left to right are, the Equalizing reservoir air pressure ( white needle and the Main reservoir (red needle). The Brake-pipe gauge ( white needle) and the independent brake pressure (red needle). The Flow meter( green faced gauge). The next is the amp gauge, the needle goes to the left of zero that is for dynamic braking. The needle goes to the right, that is the power indication off the main generator. The partially visible gauge up above is the electronic speed recorder. You can see the valve is cut-in, the small black spring loaded cut-in cut out is pointing to the right at a 90 degree angle. The Automatic brake valve is set to full service and the independent fully applied.

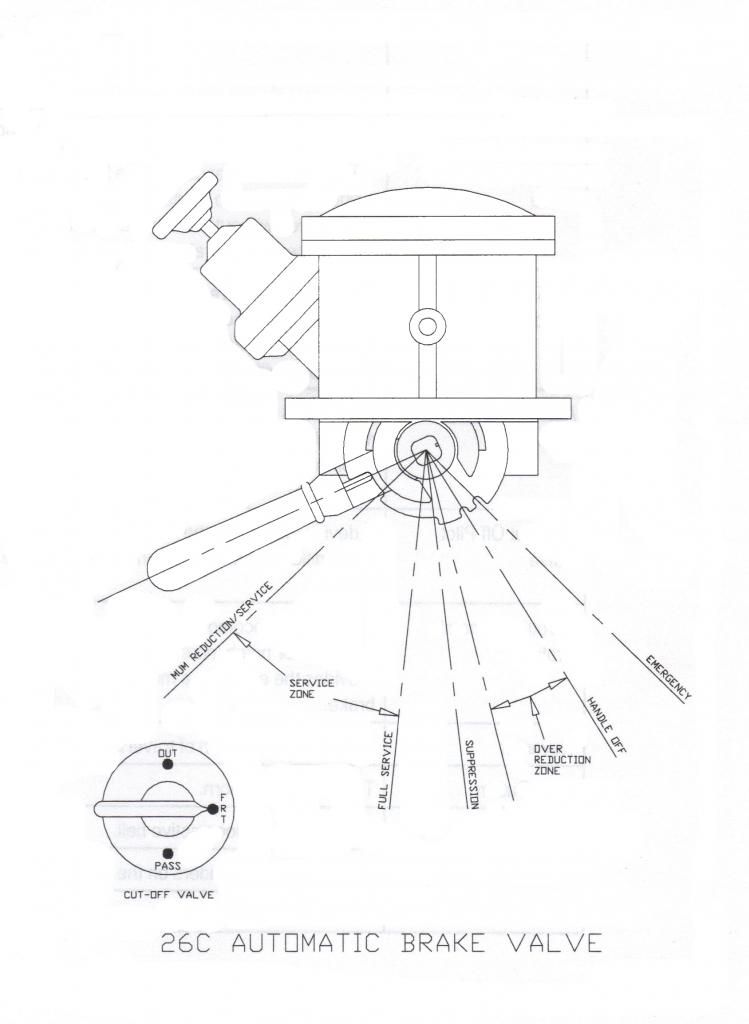
*A schematic drawing of the 26-L brake valve quadrants ( positions).

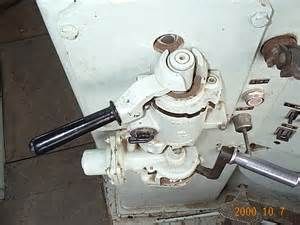
Looking down on a 26-L automatic brake valve. The valve below, with the crooked handle is the 26-A Independent brake valve, this is also known too, as a self lapping brake, all on or all off, and you can vary pressure as needed. press down on the handle, will activate the bail down feature.
The automatic brake valve, is directly to the far left hand side of the control stand. The two recessed bolts, on top and the square that is exposed is where the brake valve handle fits in. If you look at the the quadrant (the dark colored strip), from left to right is Release, the next notch, is the “Minimum Reduction” or “initial reduction”. This is followed by the Service zone. Suppression, then Handle Off or Continuous Service. The last notch on the quadrant is Emergency.
Release:
Release does what it says. It provides for releasing a set of the air, and it allows charging of the Brake pipe and associated reservoirs on each locomotive and car(s).
Minimum Reduction:
The minimum reduction will set 7 to 8 lbs. This is a light reduction, and you cannot set anything less that that. It takes at least that much, on a fully charged brake pipe, to start setting air. When you set your air, it is just not moving the brake valve handle. You also look at your gauges on the control stand. You will look at the Equalizing Reservoir. You make your application, by observing the white needle, and bringing to to the desired reduction. The other gauge, also a white hand or needle, will begin moving. The equalizing reservoir causes the brake pipe to reduce at a “service” rate. Remember I said that 7 to 8 lbs of air off the pipe, that will equate to 17.5 to 20 lbs Brake Cylinder pressure on each car. Brake cylinder pressure at application, equal 2.5 time that of the reduction off the brake pipe.
Remember, your control valves on each freight car react to the decrease and increase changes in the brake pipe pressure. When the brake pipe reduces, the slide valves or diaphragms will align ports that allow the auxiliary reservoir to flow into the brake cylinder. This also cuts off any charging. Upon the release, the same, will align to allow charging from the brake pipe, and exhaust the air to the atmosphere, from the brake cylinder via the retaining valves.
Service Zone:
If you continue over the raised notch that is the service zone. This extends from the raised notch on the left to the next notch reached to the right. This application zone will set from 10 lbs all the way to full service, which is 23 total lbs. After, that if you continue to handle off, and the brake valve is cut in, you are just exhausting air to the atmosphere, and no more braking force is applied. Why?, because you reach a point of equalization. After the brake pipe and equalization reservoir gauge reaches 60lbs, what occurs is the Brake-pipe, the Equalizing reservoir, and the control valves are all equal pressure. Remember air pressure opposing air pressure? After equalization is reached, other than an emergency application, you have reached total braking. If you are foolish enough to draw further you risk losing an effective emergency application.
Suppression:
If you move just slightly to the right of a full service, you will reach a small raised area. You also will feel a click or notch inside the valve. That is Suppression. Suppression does two things. It resets the automatic brake valve PCS (Pneumatic Control Switch), which opens after an emergency application, regardless of the reason. Failure to acknowledge the Alertor or tripping the over speed on the locomotive. Over speed is the speed recorder is set for 70 mph if exceeded a small alert whistle will sound, followed the opening of the PCS. The brake pipe will reduce to zero at a service rate, and NOT and emergency application rate.
Handle OFF or Continuous Service:
This allows for removal of the automatic brake valve handle. This position is accessed after placing the Brake valve cut out to “OUT”. This renders the brake valve in-operative It also causes the Equalizing reservoir to drain down to zero psi. The brake valve is in this condition, either it is a trailing unit in the consist, or you are in manned helper service. The Brake valve is cut out, and the independent remains active.
Remember with a No. 6, a 24RL and a 26-C brake valves, only one “ACTIVE” or operational valve can be cut-in. That’s why the others are placed in the Cut-Out mode.
The only time handle off with a cut-in brake valve is used, is at the terminal. The train is yarded and stopped. A 1000 or 1500 mile inspection is needed. You draw the air down to either 25 lbs or zero, close the angle cock on the power and pull away. Your power is probably going to the house for service and fuel. The original may come back on or the consist is relayed.
Why was this done? If the application was made to full service, angle cocks closed on the power, the standing portion would go into emergency. That okay you are thinking to yourself. The train is stopped and the air is really set, yes and when it goes into emergency what happens at the brake cylinder? The emergency and auxiliary reservoirs totally empty, and are forced into the brake cylinder. Now those brake cylinders are out further that they normally wold be. The car-men are going to work this train as soon as the power is off and the track is locked out. The car-men want to see the brake cylinders in a normal condition. This will determine what adjustment is needed if any. The brake shoes will be checked as well, and replaced as required.
Back to the brake valve, if you continue to the farthest right stop, with the handle, you have reached the emergency position on the valve.
Emergency:
This is where an emergency application ( by the engineer ) is initiated. An emergency application can happen at any time from any source. If it comes from anywhere, other than the brake valve, the Equalization reservoir will be in the last position, it was placed and the Brake Pipe gauge will be at zero psi. Once regardless of the cause, the emergency application is started, it cannot be taken back. It will vent the brake pipe from the origin, to the end, or each end of the train. If there is a separation of the air hose, or a physical separation of the train. The emergency application will propagate to the end of the brake pipe(s). It takes about a drop of 10 lbs psi in less than a second and a half for the vent valves to trigger, on the cars and locomotives in the train. The vent valves are located on cars that are 75 feet or longer. They are piped in the brake pipe via a pipe bracket and the A-1 reduction relay valve. The A-1 works in conjunction with service reductions and emergency applications. This allows for extra brake pipe volume to transition to a uniform decrease during service applications and triggering the vent valve during and emergency application.
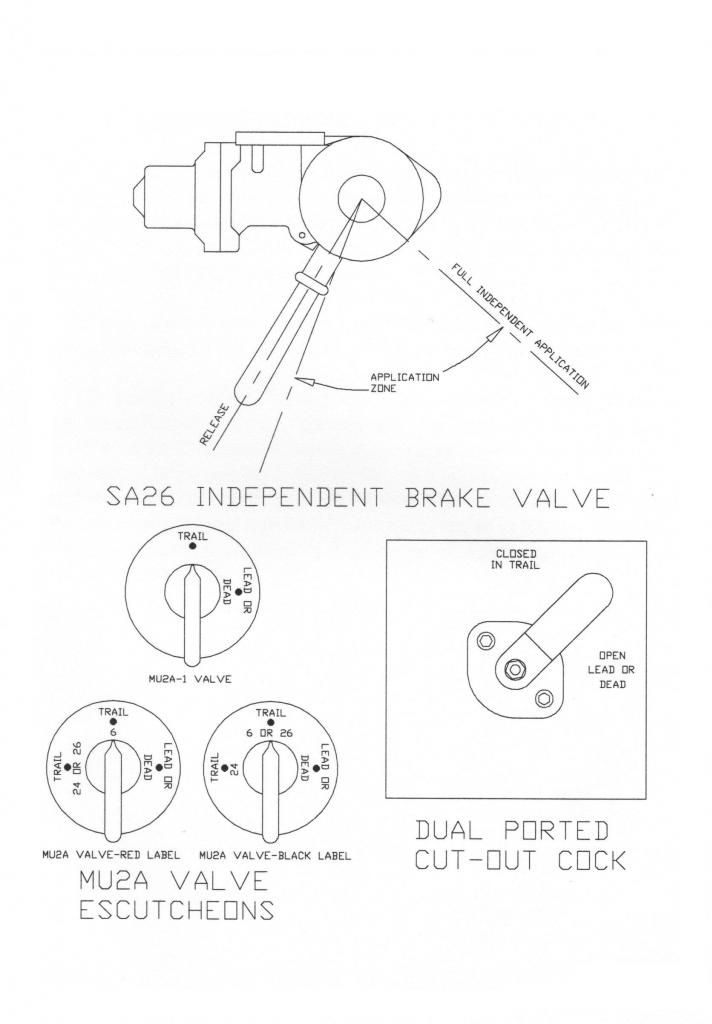
Looking below the Automatic brake valve is the SA-26 independent brake valve. That controls the locomotive or locomotive consists only.

A schematic drawing of the SA-26 independent brake valve. Also the cut out, for that as well.
Thanks for reading.
Last updated July 10, 2018


Loading comments...